Here are some things I discovered while switching to Reaper from Cubase after I landed a job scoring a TV show.
1.
Get A Free MIDI Orchestra and Template for Reaper
Download this awesome guide/template for reaper that also show you some free libraries that are already plugged into the template and ready for use. If you need to compose something today, and have no cash to spend, here is your solution!
Reaper Orchestral Scoring Template v2019 – 100% Free!!! (101 Tracks)
Thanks to AJB for putting that awesome collection together!
2.
Using Subprojects for Scoring Your Film
One of the main reasons I switched to Reaper from Pro Tools/Cubase, was because I love the robust management of subprojects from the main project timeline.
As summed up in the SoundOnSound article:
Reaper’s Subprojects allow the majority of the benefits from…setting up a master project to contain the entire film, but composing each cue inside a Subproject. This provides a ‘whole film’ view, where individual cues can be accessed quickly with a double click, and then edited. And, since we’re dealing with audio, any time-signature or tempo changes within a cue Subproject will remain completely independent of their neighbours, just like with the project-per-cue approach.
I mean, how amazing is that?
This video does a pretty great job of explaining a workflow for composing films with Reaper and subprojects:
You may fine-tune this for your workflow. I also use Google Sheets (sheet.google.com) to track and coordinate with the film’s music editor what my in and out timecode is for each cue. Alternatively, I suppose you could manually set the time code start time in your subproject’s Project Settings so that when you export your stems, they come with the correct timestamp.
Just hit ALT+ENTER keys to open your project settings where you can do that:

3.
Expand and collapse all tracks with a single click
Taken from the enhancement by dog_eggs_46 on Reddit.
Go to Actions in the menu -> Show Actions List
Then beside Custom Actions choose New

Create Custom Action in Reaper
The search for and drag from the left to the right the following actions in this order:
item 1 | track: select all tracks – this is the addition to the original post
item 2 | mixer: toggle show tracks in folders in mixer
item 3 | track: cycle folder collapsed state
item 4 | track: cycle folder collapsed state
Don’t forget to give your Custom Action a name and save. I assigned this to the hotkey CRTL-F (for folder) which shouldn’t conflict with any other key commands.
As a bonus, you can create a menu item with an icon, by right-clicking your icon menu and choosing Custom.

This is my awesome paintbrush art showing you where to right click your mouse
The Customize Toolbar -> Add -> Choose your custom Action that we called something like Expand/Collapse Tracks and the -> Set. It will not appear in your icon menu. You can also change the icon if you wish. Don’t forget to save your new menu!
4.
How to get the timecode at the start of a region and copy it to your clipboard
I know, this might seem a little esoteric. But let’s say you create an empty item at the time code where you start a new music cue. Well, a quick way to grab that time code to name a file or folder for your music editor is as follows:
Actions Menu Item -> Show Action List -> Create Custom Action, and then search for and drag to the right the following two actions:
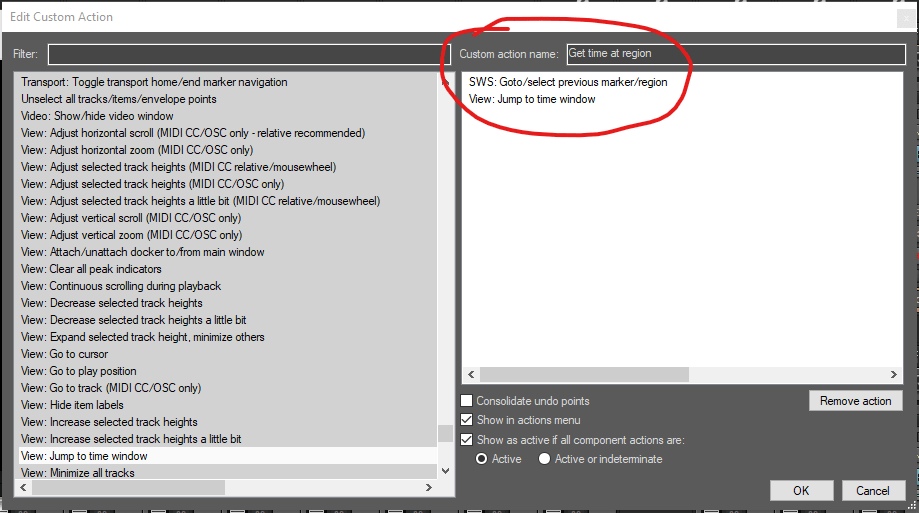
Custom Action for Get Time – Click the image for higher rez!
What this will do is:
– Go to the start of the region closest to your timeline position.
– Open the Jump to Time window where the start time of the region will be selected. Now all you have to do is CRLT-C to copy and voila, the time is on your clipboard for pasting.
KEYBOARD SHORTCUT: You can tap the ‘ ] ‘ key to jump to the next marker or ‘ [ ‘ to jump to the previous. To make this even faster, I assigned the available key combination of CTRL+ALT+] to my Custom Get Time at start of region action.
You can of course also create an icon for this custom action in your toolbar as in step 1.
Important to make sure that your timeline/timebase is set to hh:mm:ss:ff and also make sure your project settings are using the right frame rate for your scoring for picture project!
5.
Save and Recall Your Screen Layout
Even with two 27’monitors, I am still always having to toggle back and forth between email, cue sheets and more. I often have to move things out of the way and so on. So having a saved layouts that you can recall with a single keypress is a major deal.
Here is an example of my left screen where I have my mixer, marker list, Big Time, and Video window with TimeCode burn-in

On the right screen I have my editor/track window. I can recall this layout at any time simply by hitting the F7 key.
So make sure to save your layouts and assign them to a key whenever you are happy with your workspace! You can access is by hitting CRTL-E (assuming you haven’t reassigned it) or from the View Menu.

6.
Another Reaper Scoring Powertool – OTR
I noticed I was getting some traffic from Reddit for this post, and in the comments, user Cockator shared information about OTR – the Orchestral Template for Reaper. It’s a paid/donationware template that does a LOT of organizational heavy lifting. It also assumes you already own some quality orchestral libraries, but it does come bundled with some instruments.
I am not 100% sure that it matches my workflow, but I do intend to play around with it as an obviously huge amount of thought and work has gone into its organization and development. So check that out too.
Here is their primer video. Even if you don’t use this product, it may help elucidate the many ways in which Reaper can be customized to handle many complex jobs and pipelines with a few clicks.
Hope these tips help you on your journey!
Comments are closed.